Using The Oakland Chip
feb 9, 2017
Update 10/2018: RIP the CHIP
My project group for Interactive Device Design used Oakland’s CHIP as the brains of our final project: mewsician, your musical companion. Mewsician’s goal was to provide more intrinsic motivation to young ‘mewsicians’, and was a blast to design and manufacture. Here, I will go over takeaways I had from working with the CHIP. I may add to this later, as I have been playing around with a PocketCHIP recently.
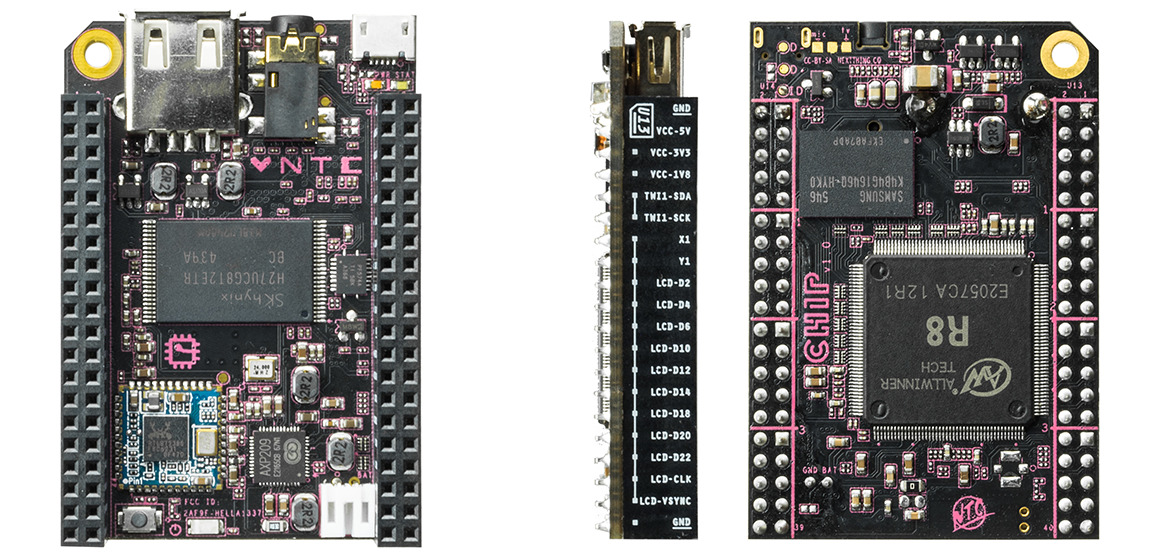
The CHIP is an innovative and accessible piece of hardware. The product sells at just $9, and is about as powerful as an iPhone 4s from 2011. The company has spoken on how they are enthusiastically supporting hardware for educational and hobbyist purposes. This is incredible work from my perspective - I remember playing BlockDude and programming a quadratic equation solver in high school on a TI-83, which somehow still retails at over ten times the price of a CHIP. I eagerly anticipate what upcoming generations of students and makers will do with better access to using embedded computation creatively, and applaud The Next Thing’s progress towards the democratization of technology. On the other hand, naming your electronics device ‘CHIP’ makes finding documentation kind of arduous ¯\_(ツ)_/¯
overview
Our system used a range of the CHIP’s abilities, including: GPIO, audio input
and output, networking, and systemd configuration. Using the CHIP to generate
output from audio from files was relatively easy, and most of the issues we ran
into were around trying to record audio. CHIP has several general purpose
input/output (GPIO) pins which could be used to trigger playing the audio, and
there are python libraries for interfacing with the board’s GPIO. It is more
complex than an Arduino for this, though… you either have to connect to the
board and start the python script or configure the board so it starts the
script whenever it is powered on. Additionally, the timing requirements are not
tight enough to power Adafruit’s neopixels, so instead we had the CHIP
power an Arduino Nano to directly control it. Still, it is an robust,
accessible (and open-source!!!) development platform with a solid
community and detailed documentation.
startup commands
There are several configuration steps that have to be done when working with the CHIP. One notable advantage of using the chip is that it can run headless (without an external monitor). You can setup a direct ssh line into them, or use screen to access them. Here are commands that we noted during our time setting up the CHIP, which potentially could be useful when getting started:
# list wifi spots
nmcli device wifi list

# connect to wifi (can be saved as a bash function)
sudo nmcli device wifi connect "$1" password "$2" ifname wlan0

# turn off wifi
sudo nmcli dev disconnect wlan0

# check internet connectivity
ping 8.8.8.8

# setup ssh agent
sudo apt-get install avahi-daemon

# restart mew (systemd) service
sudo systemctl restart mew
We also have a general setup scripts, which could contain something useful, but also contains some system specific requirements (comments included). The official guide for the CHIP helped us get started quickly.
boot processes
An Arduino starts running whatever code was loaded onto it when it receives
power, but CHIP is a full Linux computer so start up commands can either be set
through a GUI, or if you are running it headless like I was, then with the
systemd service. Here is the systemd boot configuration for this project.
It was titled mew.service, and in general should end in .service. This file
tells your CHIP that when you turn it on, it should start running a certain
script or program.
[Unit]
Description=mewsichip
After=default.target

[Service]
ExecStart=/home/chip/mewsichip/start
Type=simple

[Install]
WantedBy=default.target
For example, this is the script that is the argument for Service/ExecStart
in the system configuration file above. It kills any running audio processes
that could be running, sets the working directory to where the startup script
is located in the file system, resets the CHIP’s GPIO configuration and
then finally starts running the main python script that we setup.
#!/bin/bash

# kill any remaining audio procs
ps aux | grep record | head -n3 | awk '{ print $2 }' | xargs -L 1 sudo kill

# getting the current working directory
# https://stackoverflow.com/questions/59895
DIR="$( cd "$( dirname "${BASH_SOURCE[0]}" )" && pwd )"

# free up any exported GPIOs
sudo bash "$DIR/script/unexport.sh"

# beginning running mewsician, w/o warnings, and pass in auth
sudo python -W ignore "$DIR/python/mewsicode.py" $(cat "$DIR/chip.auth")
[Here]
is the unexport script we used to free up the GPIO pins, and
[here]
is the link to our main python application code, mewsicode.py. It had a
similar setup and loop structure that is common in Arduino programs.
audio stack overview
- record: getting and saving audio source data
- output: given a file, generating actual noise from the chip
- upload: sending audio file to cloud storage service
recording audio
I found help from stack overflow. This is a handy script for recording audio because it shows you the amplitude of the input wave as it comes into your system in a numerical form, so visually discerning whether recording is working (roughly) correctly is facile. There was a header we soldered to try and get it work, but I am unsure if it actually was needed. We were getting some odd feedback while trying to record audio through the headers, so we ended up getting a headphone splitter in order to access both the microphone and the CHIP’s audio output.
# show amplitude while recording

import alsaaudio, wave, numpy

inp = alsaaudio.PCM(alsaaudio.PCM_CAPTURE)
inp.setchannels(1)
inp.setrate(44100)
inp.setformat(alsaaudio.PCM_FORMAT_S16_LE)
inp.setperiodsize(1024)

# test.wav is file written to
w = wave.open('test.wav', 'w')
w.setnchannels(1)
w.setsampwidth(2)
w.setframerate(44100)

while True:
    l, data = inp.read()
    a = numpy.fromstring(data, dtype='int16')
    print numpy.abs(a).mean()
    w.writeframes(data)
playing audio
This was the smoothest part of working with the CHIP. There are plenty of
players out there (aplay, mplayer, etc), and playing back audio from the CHIP
was seamless. Given an audio file test.wav, you could just hook up headphones
or a speaker with an AUX cord and run mplayer test.wav to play it - easy.
uploading files
Once we were able to get a solid stream of audio coming in, we directed the audio stream to to a file locally, and then finally uploaded it to the ~cloud~, where we had a server running on Heroku. Starting out, we just used a simple library to make PUT requests to our server:
import requests
from time import gmtime, strftime
from time import sleep
import random

def make_requests():
    url = "https://mewsician.herokuapp.com/demotime"
    return requests.put(url, data = {
        'data':
        "Hello Mewsician, here's a random number: " + str(random.randint(0,100))
        })

while True:
    print make_requests()
    sleep(5)
Eventually, we used python to attach the file to upload (reference from our
python main source file), externally calling curl at the system level to make
a more complicated PUT request involving a form:
# stop current recording, compress file format
# trigger external uploading if connected to the network
def upload():
    global mname
    print("\nStopping recording...")
    mpid.terminate() # from record()
    mname = bname + ".mp3"

    # stopped recording, update arduino lights
    send_serial('u')

    print("Compressing audio...")
    subprocess.call(['sudo', 'chown', 'chip:chip', fname])
    subprocess.call(['lame', '-V2', fname, mname]) # convert
    subprocess.call(['sudo', 'chown', 'chip:chip', mname])

    print("Uploading music...")
    auth = 'auth=' + authentication # upload
    path =  os.getcwd() + '/' + mname
    upload = 'file=@' + path

    args = ['curl', '--form', upload, '--form', auth, 'http://mewsician.win/upload']
    try: # if upload fails (no network connection), write it to a queue
        print(subprocess.check_output(args))
        print("Cleaning up...")
        subprocess.call(['mv', '-v', mname, audioLoc])
        subprocess.call(['rm', '-v', fname])
        print("Complete.")
    except subprocess.CalledProcessError as e:
        with open(audioLoc + "queue", "a") as q:
            q.write(mname)
        print(e.output)
Please get in touch with any feedback or questions. Thanks for reading!